Why Did My Video Disappeare From Upload Stars
Kaltura Capture Recordings Won't Upload
Last Updated: September 24, 2021 12:56:10 PM PDT
If you're experiencing issues uploading your Kaltura Capture recording such that it ends upwards in Canvas, read below for some ideas on how to solve this.
Problem: Your Kaltura Capture recording won't upload. Maybe you clicked "save and upload" but the upload never appears to complete and doesn't end upwardly in "My Media."
Solutions
There are several possible reasons why your Kaltura Capture recording may non upload properly. Effort the solutions below, and read the detailed instructions in the drawers beneath as needed.
- Attempt again
- Update Kaltura Capture
- Check your upload speed
- Disconnect from whatsoever VPN
- Strength Kaltura Capture to Re-Upload
- If nothing works, contact us kaltura@ucsd.edu and provide united states of america some information
Try Again
Try the simplest arroyo before diving into more complicated solutions by leveraging Kaltura Capture's "re-upload" feature. You may want to reboot your computer before you try, just to make certain your calculator has a "fresh start," and so to speak.
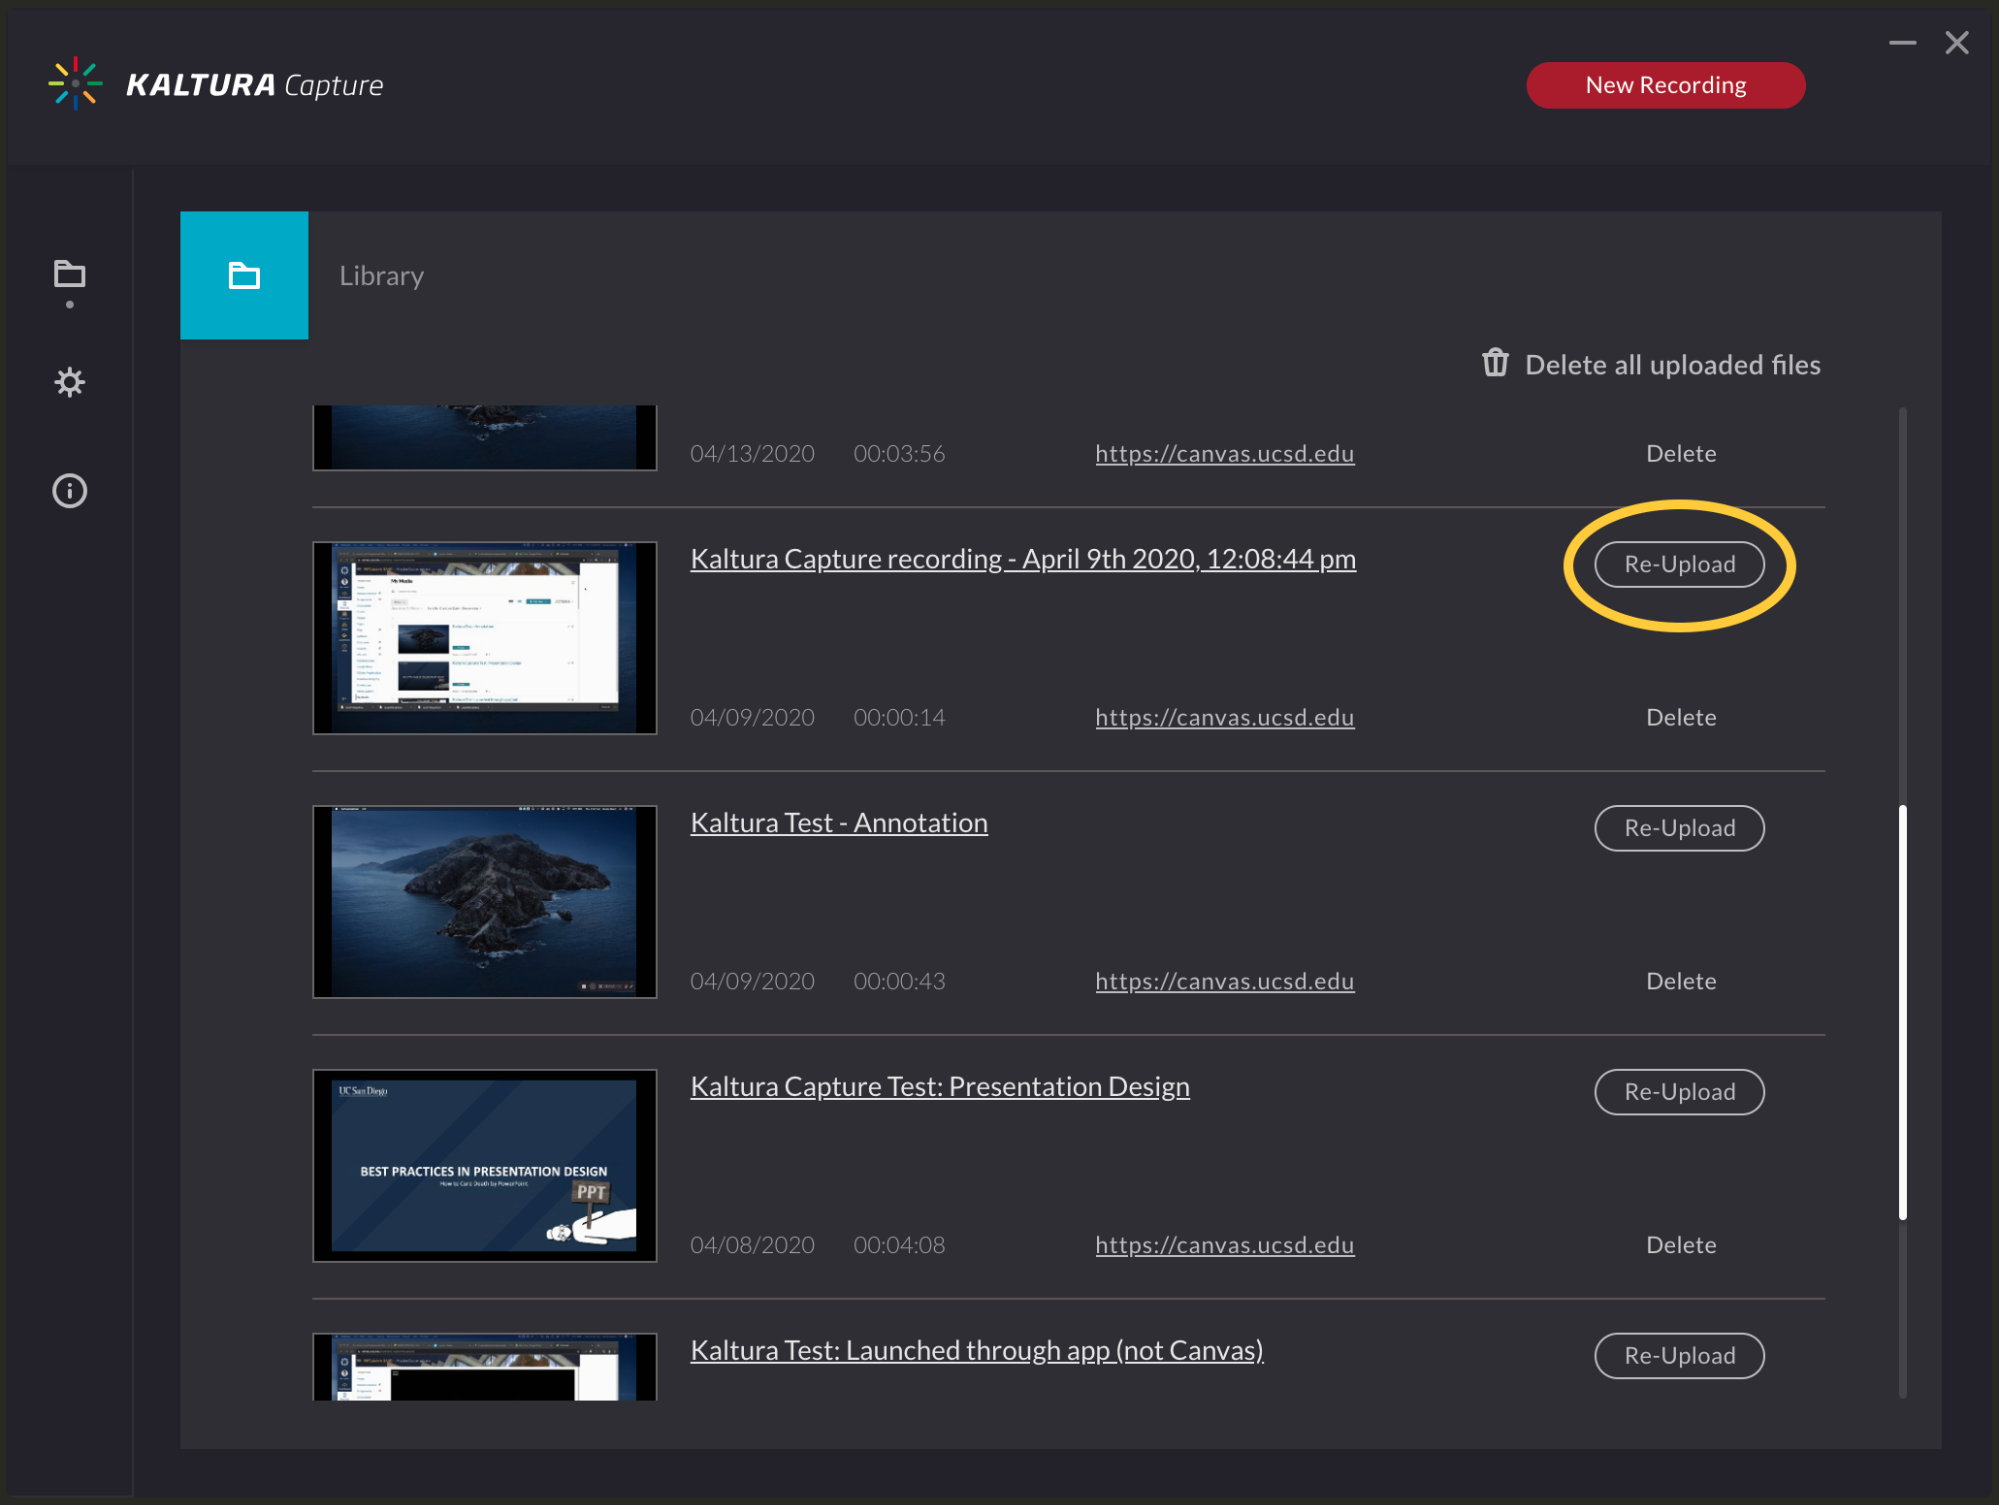
- Open up Kaltura Capture.
- Click "Manage" below the Kaltura logo on the right side of the application.

- Ensure that the folder icon is selected on the left side of the window. Locate the video y'all desire to re-upload, and click the "Re-Upload" button. Be sure non to close Kaltura Capture until the upload has completed.
Update Kaltura Capture
Brand sure that Kaltura Capture is fully updated.
- Visit https://noesis.kaltura.com/assist/kaltura-capture-release-notes. Take note of the latest version of Kaltura Capture.
- Launch Kaltura Capture.
- Click "Manage" on the correct side of the application bar.
- Click the little "i" on the left side of the window.
- Note what version of Kaltura Capture you're running. If your version of Kaltura Capture is older than the current version (i.e. a lower number), you should install a newer version. Follow the additional steps below.
- Within Sheet, click "My Media" in the left navigation.
- Click the "Add New" button near the meridian-right of the screen and select "Kaltura Capture."
Though Kaltura Capture may launch automatically (or prompt you to launch it), the page that was opened should have links to download the latest version. Install the updated version of Kaltura Capture and attempt to re-upload your recordings through the application (see the "Try Over again" drawer above).
Check Your Upload Speed
Kaltura Capture is an offline application until you terminate your recording and elect to upload it to the cloud. Presumably, your internet speeds shouldn't play a strong role in getting your recordings into Canvas. (That is, even if information technology's slow, it should make it in that location somewhen.)
That said, we by and large recommend that y'all accept upload speeds of at least 1 mbps (ane megabit per second, or about 125 kilobytes per second). If you accept a long recording and slow internet speeds, it's possible that your connectedness will time out. Try searching for a bandwidth speed test online and see what kind of upload speeds you have. If they're especially slow, effort to upload your videos on a network with faster speeds; going to campus might be a adept selection.
If y'all experience the same issues, or if you lot take robust bandwidth, review our other possible solutions.
Disconnect from any VPN
Are you using a VPN (virtual individual network)? If so, disconnect from information technology and endeavor to upload your Kaltura Capture recordings once more. VPNs can drastically tiresome downwards upload speeds since you're narrowing your upload "pipeline."
Force Kaltura Capture to Re-Upload
[Cheers to Melinda Kraft for her adapted tutorial beneath.]
You may run across the issue that you are unable to find your Kaltura Capture recording in your Canvas course, and for some reason the recording isn't bachelor with the awarding to re-upload using Kaltura Capture. Luckily, the application stores files on your figurer as a fill-in, which won't disappear until y'all delete them yourself. These instructions will walk y'all through how to locate and manually upload these files.
Notation that the instructions below are for advanced users merely and should only be followed if you have few options bachelor to you lot. That said, it is handy to know where your recording files are located.
How to Find Kaltura Capture Video Files on Your Figurer
Windows
You lot accept ii options for how to locate your recordings:
- Option 1
- Correct click on the Kaltura Capture icon on the desktop and select "Properties."
- Click the "File Location" button in the Properties window. This volition open the BIN folder, which is a level deeper than you need.
- In the file path bar, go up one binder to the Capture folder, so open the Recordings Binder.
- Choice 2
- Copy/paste the following into the search bar, substituting your Windows username for [username]:
C:\Users\[username]\AppData\Local\Kaltura\Capture\Recordings
Note that yous tin can place your Windows username is to open the folder C:\Users and meet if you see a familiar username. Alternatively, you can open the First Menu, select "Settings," and and so "Account." - Sort the list by "Appointment Modified" so that yous tin can group all the files for each recording together.
- Copy/paste the following into the search bar, substituting your Windows username for [username]:
Mac
- With the "Finder" application selected/active, select "Go" at the top of your screen.
- Select "Go to Folder" from the list.
- Copy and paste the following into the text box that opens:
~/Library/Preferences/Kaltura/Capture/Recordings - Sort the list by "Date Modified" so that you lot can group all the files for each recording together. To do and then, click the "Engagement" or "Date Modified" column heading in the file view to sort the list.
About Your Kaltura Capture Files
The files associated with each Kaltura Capture recording may appear to have gibberish names.

So what are you seeing here?
- .mp4 files. The .mp4 files are the recordings. If you recorded two sources (e.g. Screen and Webcam), in that location will be ii .mp4s. You tin can play them locally on your computer to effigy out what each video is.
- "Slides" folders. The "Slides" folders exist if you ran a PowerPoint presentation in presentation fashion during your recording. Note that if you have folders like these, information technology means that Kaltura created chapter markers for your video.
- .json files. The .json file contains the media upload parameters for Kaltura Capture.
- .jpg files. The .jpg file is the thumbnail Kaltura generated.
We strongly recommend against deleting or renaming any files in your "Recordings" binder. The recommended method of deleting Kaltura Capture recordings is past using the Kaltura Capture Awarding Library View (that yous can access via the "Manage" link in the Kaltura Capture recording bar), just make sure they are in your "My Media" and working as expected outset.
- Inside the "Recordings" folder (run into the instructions higher up), copy the appropriate .mp4 file and paste it to a dissimilar location on your estimator, such equally your desktop.
- Rename the new copy of the file to something that makes sense to you. Be sure non to remove the .mp4 extension
- Follow the steps to upload a file from your computer to Canvas, selecting the file you lot've copied. If you're not sure how to exercise this, read our tutorial on how to upload media files to Canvas.
This technique is necessary if multiple video files are necessary for the educational content of the video. If y'all want or demand your video to accept multiple streams (e.1000. your video and your screen capture simultaneously), and if you're unable to locate your recording in the "Manage" department of the Kaltura Capture application, the instructions below are what y'all should do.
- Shut downward the Kaltura Capture awarding on your estimator.
- Windows: locate the Kaltura Capture icon in the system tray (where the clock is) by correct-clicking the application icon and choosing "Quit."
- Mac: right click the application in the system toolbar and choose Quit.
- Locate the .json file with the timestamp that closely corresponds with the two source recording (come across the steps above). Note that the timestamp may not exactly match the time and date of the recordings, though it should exist close.
- Brand a re-create of the .json file just in case. Exercise this past copying the file and pasting information technology on your desktop.
- Open the original .json file with a text editor.
- Windows: Open Notepad on your computer. Click File > Open up, and select the file from your "Recordings" folder. (You can see the file path in the instructions to a higher place.)
- Mac: Open up TextEdit on your computer. Click File > Open up, and select the file from your "Recordings" folder. (Yous tin can see the file path in the instructions above.)
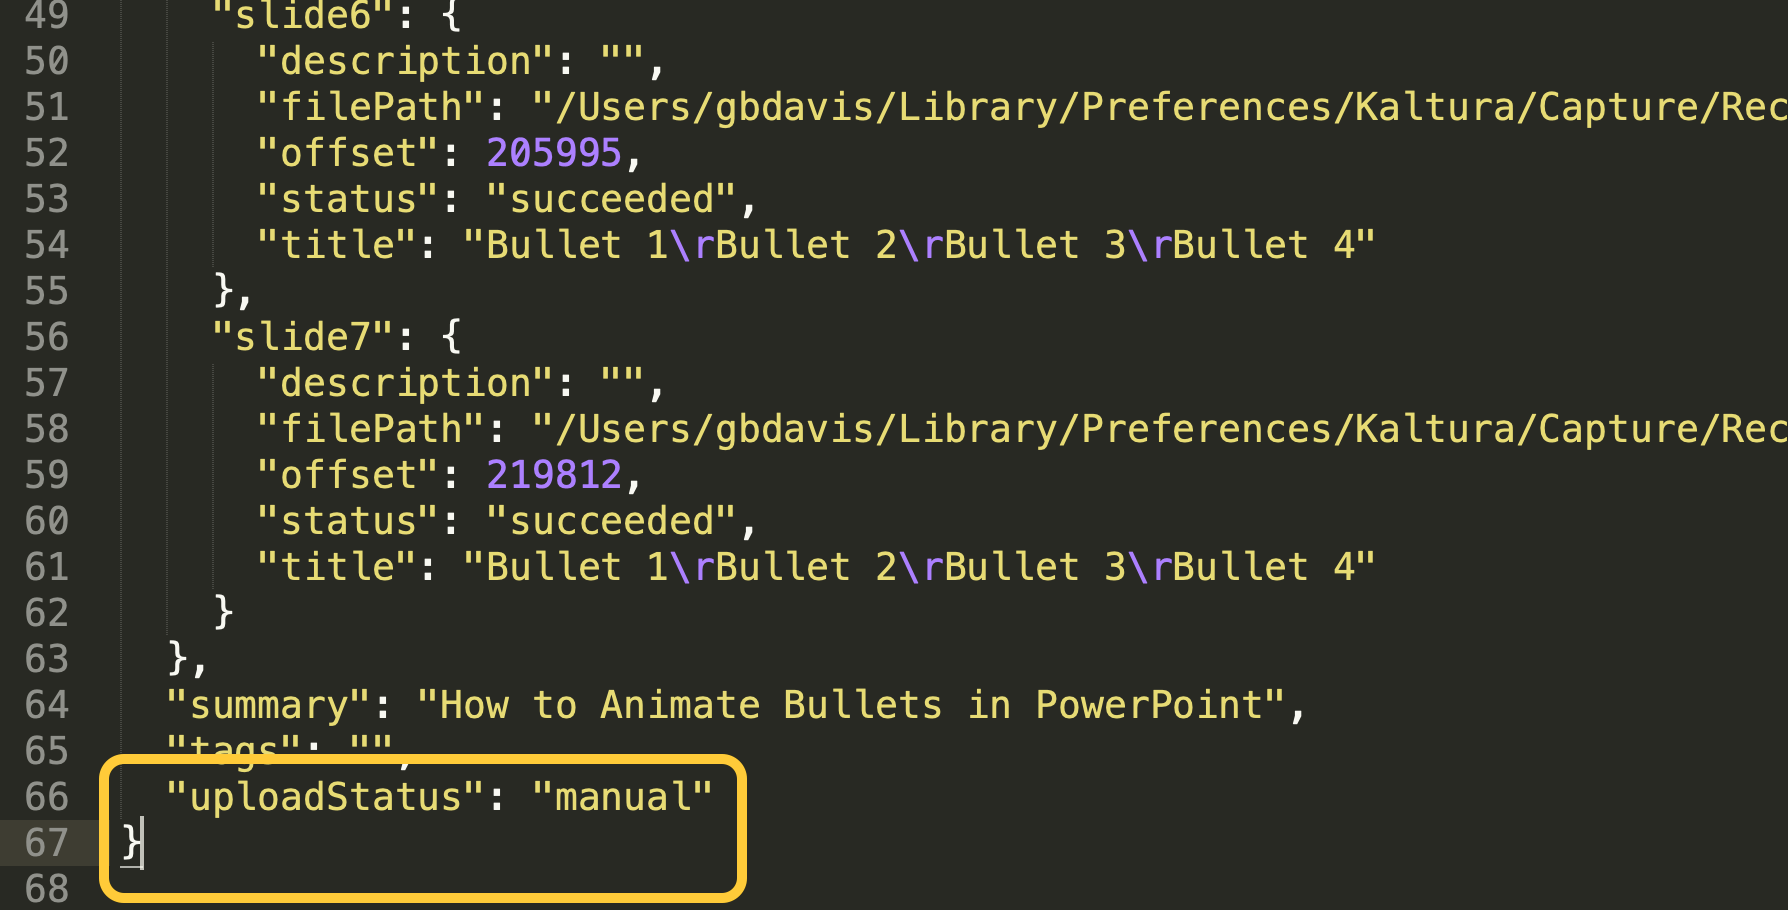
- Search for the give-and-take "uploadstatus" within the code. Y'all should see a line that reads roughly as follows:
"uploadStatus": "uploaded", - Supercede the word "uploaded" with "transmission" and exist sure not to delete the quotation marks - just replace the word within.
- Delete the comma at the stop of the line. The line of code should now look like this:
"uploadStatus": "transmission" - Delete all the remaining lines after this ane, except the last line with a endmost curly brace: "}"
- Salve the file.
- Relaunch Kaltura Capture.
- In the recorder that opens, click "Manage" below the Kaltura logo on the right.
- In the window that opens, ringlet the list to locate the recording you only prepared by editing the .json file. Information technology should have an active "Upload" button next to information technology.

- Click the "Upload" button. Exist sure to wait until the upload has completed earlier you lot close Kaltura Capture.
Your video should now show up in "My Media" within Canvass. Note that it will need to process for a little while. When the processing is done, we recommend that you scout the video to ensure information technology looks the manner you want it to.
Ultimately, the all-time workaround if you lot need your video upwards immediately is to follow the instructions on how to upload a single file, located in the drawer in a higher place.
If nothing works, or if you'd like some additional help, submit a support ticket to kaltura@ucsd.edu. In your email/ticket, provide the following information:
- Your computer's operating arrangement (Windows/Mac)
- What version of Kaltura Capture yous're using
- Whether you've tried to upload from a different network
- Roughly how long your Kaltura Capture recording(s) are
- Your internet upload/download speeds
- Whether you're using a VPN
- Whether you've attempted to upload the recording manually by locating your Kaltura Capture recording files and uploading them straight to Canvas
- Your upload log token
Read below on how to provide some of the information that may not exist easy to decide.
How to Find Your Kaltura Capture Version
- Visit https://noesis.kaltura.com/assist/kaltura-capture-release-notes. Accept annotation of the latest version of Kaltura Capture.
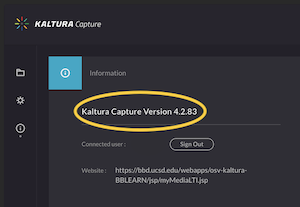
- Launch Kaltura Capture.
- Click "Manage" on the correct side of the application bar.
- Click the piddling "i" on the left side of the window. Your version of Kaltura Capture should exist near the lesser of the window.
How to Determine Your Net Speeds
Search for a website that can provide you an Internet speed test (due east.thousand. https://world wide web.speedtest.net/) and let the states know your upload and download speeds.
How to get Your Upload Log Token
- Open up Kaltura Capture.
- Click "Manage" on the right side of the awarding bar.
- Click the gear icon on the left side of the window that opens ("Settings").
- At the bottom of the window, click "upload logs." The logs will upload for a bit.
- When they're done, a little window will open showing a long string of characters - the "token." Copy that and send information technology along in your response. (It will look something like "62e8a9e3-b047-4d69-acce-f91feab600d0.")
Demand boosted assist with videos? Contact the Multimedia Services team at kaltura@ucsd.edu.
Source: https://blink.ucsd.edu/faculty/instruction/tech-guide/instructional-videos/videos-canvas/troubleshooting/kaltura-capture-wont-upload.html
0 Response to "Why Did My Video Disappeare From Upload Stars"
Yorum Gönder